Photographing a Total Solar Eclipse
19 February 2024
I’ll be editing this blog post as time allows with information that’s hopefully helpful for folks as we get closer to April 8.
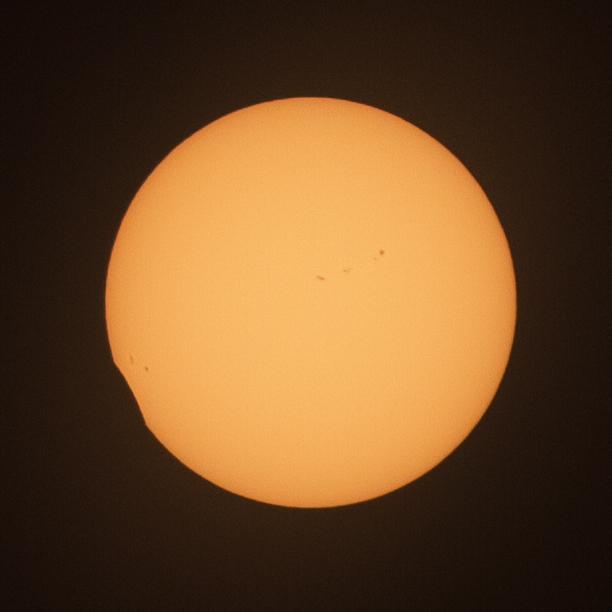
 August 21, 2017 Eclipse
In case you haven’t heard, there’s going to be a total eclipse of the sun on April 8, 2024 that crosses much of the United States (as well as parts of Mexico and Canada).
Introduction
Total solar eclipses are an amazing natural spectacle - the most amazing one I have yet to see, and 2nd place isn’t even close. I’ve written a bit about overall planning on my personal blog. This post focuses on photography.
The first question you need to ask yourself is whether you should photograph the eclipse. I’ve heard many eclipse veterans give the following piece of very sound advice.
If this is your first total eclipse, watch it. Don’t photograph it.
- Lots of eclipse veterans
I heard this advice leading up to 2017, and I ignored it. Well, maybe I didn’t ignore it, but I did consider what’s at the heart of it - making sure that you actually experience totality. I’d wager most anyone who’s into photography can relate to the fact that photography can take you out of the moment. An experience becomes different when you put a camera between it and yourself. This is amplified as the photography task becomes more challenging. A total eclipse is exceedingly rare, very brief, and very dynamic. It’s an experience you don’t want to miss because you’re messing with cameras, just like if you were attending a loved one’s wedding you wouldn’t sit there in your chair watching the ceremony livestream on your phone. So, given that what’s at the heart of this advice is to not let photography mess up the experience of seeing a total solar eclipse, my personal advice is slightly different.
Don’t mess with cameras during the total phase of a solar eclipse.
- Me
We’ll talk more about it later, but I’ll give a little spoiler here at the outset to say that the key to this is automation. If you’re willing to put in some planning and work to automate image capture, you can enjoy totality with your own two eyes while your camera(s) (hopefully) snaps (or snap) away. If you don’t think that’s something you’re up for investing the time to do, then I’d suggest you pass on photography - especially if you’ve never experienced totality before - and instead enjoy the most amazing show I think the natural world has to offer. At the very least, put a priority on experiencing it and set some ground rules to put photography at a distant second like giving yourself 20 seconds to troubleshoot any issue that comes up during totality (which is close to 10% of the total time you’d have to experience totality on the centerline).
Photography
If after reading that, you’re set on photographing the eclipse, here are nuggets I’ve gathered from my meager experience in 2017 and extensive research.
Equipment
You can get away with just a camera, lens, and (for the partial phases) filter, but you’ll be helped by having other things I’ll discuss below.
Focal Lengths
This depends on the phase and what you’re focusing on, but in general you’ll want long lenses. The sun is small in the sky and will come close to filling the frame at an equivalent full-frame focal length of about 2000mm. However, the corona is much larger than the bright photosphere that the moon will cover up, so if you’re planning to capture the corona (and you should be planning to capture the corona), you’ll want something quite a bit wider than what makes a good filtered-solar-disk image. 300mm on full-frame is a pretty good target for the corona - in 2017 I shot totality with a 200mm lens on a crop-sensor camera body (320mm full-frame equivalent), and that seemed like a pretty good focal length for getting the broad corona. That said, I’ve seen corona images taken with focal lengths as (relatively) wide as 85mm that I find very striking.
There’s also a broader story to tell about experiencing the eclipse. Wide angle is useful for that - especially since totality will be very high in the sky for most of the path - around Dallas, for instance, the fully-eclipsed sun will be about 65º above the horizon (i.e. you’ll need a very wide lens to show both foreground and the eclipsed sun). If you’re in Texas with a wide-angle lens, maybe look for some bluebonnets. It’s their time of year to bloom.
Video
Video can make a neat medium for much of what happens in an eclipse. In 2017 we directed a video camera at our group to capture our reaction to totality, and it’s a video I still enjoy re-watching.
Other Equipment To Consider
- Tripod - Get a solid tripod to get sharp images at high magnification.
- Viewing/Framing Aids - Things like tilting screens or angle finders for your camera are very helpful when it’s pointed high in the sky.
- Shutter Remote - You need some sort of remote shutter, as pressing your shutter button will shake your camera.
- Solar Filters - Needed for partial phases; I discuss this more in the partial phase section below.
- Tracking Mount - discussed below.
- Canopy - You’ll appreciate having some sort of shade to retreat to.
- Solar Eclipse Glasses - So you can quickly look to see how things are progressing without ruining your eyes - get reputable ones.
- Computer and accessories - If you’re going to automate with a computer, make sure you can power it through the whole eclipse. Also consider what might help you with using it outside like a table and some sort of screen shade.
Dealing with the Rotating Earth
The earth rotates 360º relative to the sun every 24 hours, or about ¼º every minute. The sun itself is about ½º across in the sky. This means every two minutes, the sun will move one sun-width across the frame of a stationary camera. If your camera is fixed on a tripod with a long focal length, this can mean a lot of reframing over the course of an eclipse, potentially including during the few minutes of totality. Keeping the sun in frame was my least favorite part of photographing the 2017 eclipse. Additionally, if you’re shooting long focal lengths during totality, this motion can introduce blur for some of the longer shutter durations you might use for capturing earthshine and the outer corona. This year, I’m planning to use a motorized equatorial mount. I expect it’s going to make my life a lot easier than in 2017 when I just had my lens on a decent ball head. The one trick is polar aligning the mount during the day. I know I can’t get it perfect unless I set up the night before when I can dial it into Polaris, but I’m hoping that if I can get it pretty close, I won’t have to futz with re-framing too much. I can’t really give advice here as I don’t have experience with this yet (I’ll be practicing this process in the coming weeks), but I can say this was one of my greatest annoyances in 2017. I also picked up the SkyWatcher SolarQuest and will be using it with my longer focal lengh shots - although it’s probably a good idea to cover its optical sensor a little while before and after totality so that it doesn’t get thrown off (I’ve not tested it in these conditions). So far the one I’ve worked with has worked pretty reliably, although I’ve heard they can have issues somtimes, so test, test, and test some more. Also note if using this with a photo lens that you’ll need a Vixen style dovetail mount rather than Arca Swiss.
One important note if youre using an equitorial mount is that the sun will cross the meridian for all locations on the path SW of about Bloomington, Indiana. Around Llano, TX is where the sun crosses the meridian at maximum eclipse. Be aware of this and have a plan if your EQ mount does meridian flips automatically. If this happens unexpectedly - especially around totality - it would likely be a very bad thing.
Capturing Eclipse Phases
Eclipses are denoted by four main events:
- C1 - The lunar disk begins to cover the sun - the start of the partial phase.
- C2 - The last bit of the photosphere (the bright part of the sun) disappears behind the moon. This is the start of totality.
- C3 - The photosphere reappears from behind the sun. End of totality, back to the partial phase.
- C4 - The last bit of the lunar disk passes from the solar disk. The eclipse is over. Traffic jams abound.
 Note that C2 and C3 only apply if you’re in the path of totality. Otherwise you’ll only experience C1 and C4.
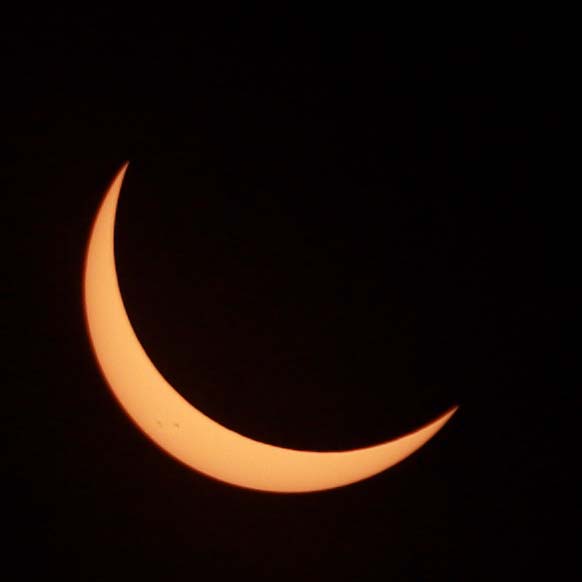
Partial Phases
The partial phases of the eclipse run from C1 to C2, and from C3 to C4. If you’re not in the path of totality (no C2 or C3) then everything you experience will be a partial phase.
Safety
There’s a good bit to say here, but for now, I’ll just reiterate the important safety advice that you must have a proper solar filter as the first optical element in your camera setup if you’re using any sort of long focal length when shooting partial phases. Even at wide angles, you might put your equipment at risk if you leave the sun in frame for a longer period of time. Blindness and equipment damage can happen if you fail to follow this guidance. Rear filters are no good because the lens will concentrate solar energy on them which will be dissipated inside your equipment, likely burning or melting through the filter. Similarly, regular ND filters - even very dark ones like 10- or 15-stop NDs - that aren’t designed for solar viewing may allow non-visible spectrum through like IR and UV that you can’t see but which can be extremely damaging. If you doubt the possibility for equipment damage, have a look at Lens Rentals’ blog article from after the 2017 eclipse. The lead picture there of a $10,000+ Canon EF 600mm f4L IS ii with melted iris blades should give any photographer pause.
One other safety note in addition to this discussion about filters - be especially careful if you’re using a DSLR or other camera with an optical viewfinder. In such cases, when looking in the viewfinder, you’re directly observing the light coming through the lens. If any of that light is unsafe for some reason because your filter has a hole, it’s a cheap knockoff that doesn’t filter all frequencies, or something knocks the filter off while you’re looking through the camera, it puts your eyes at risk. If instead you’re using a mirrorless camera or liveview on a DSLR, then you’re looking at a video feed of the light hitting the sensor of your camera. Your back screen or electronic viewfinder can’t produce light that will damage your eyes. In this case, while your equipment might be damaged if something goes wrong with your filter, your eyes will be safe.
Focal Length and Settings
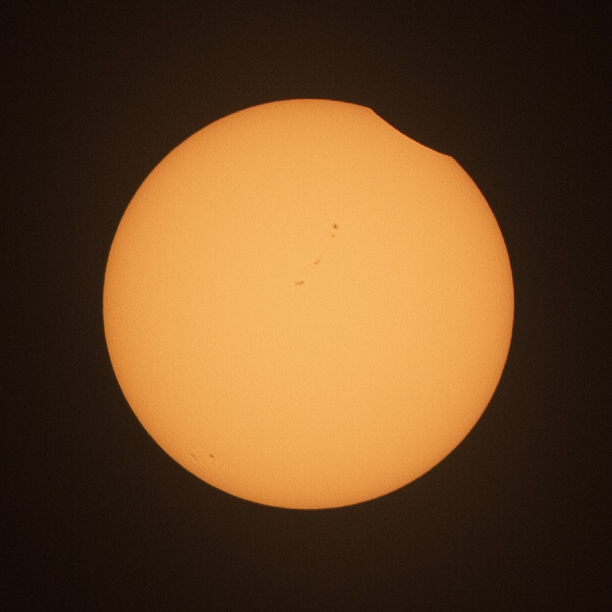
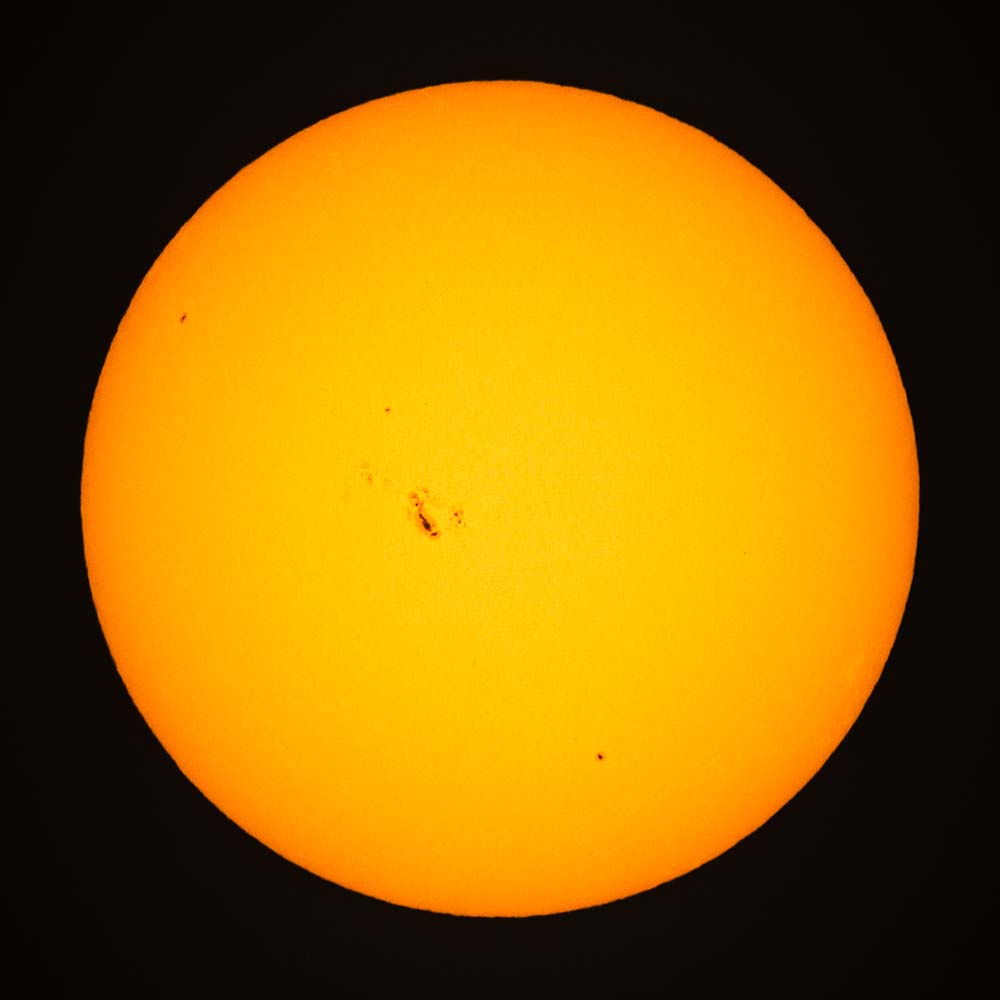
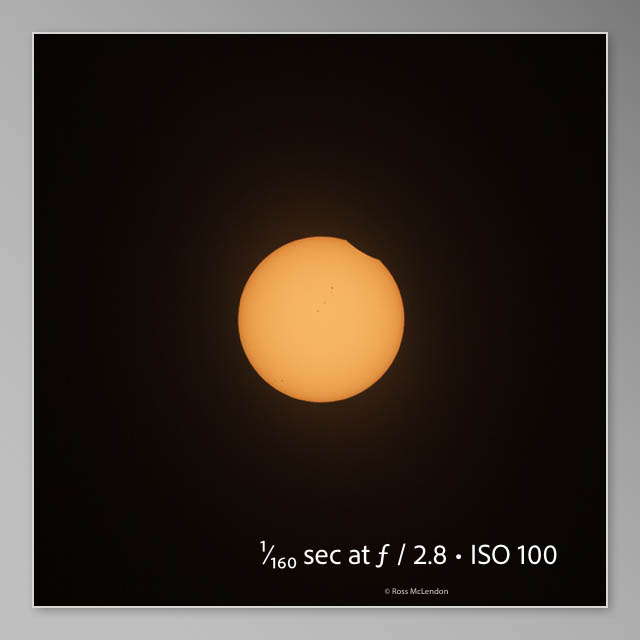
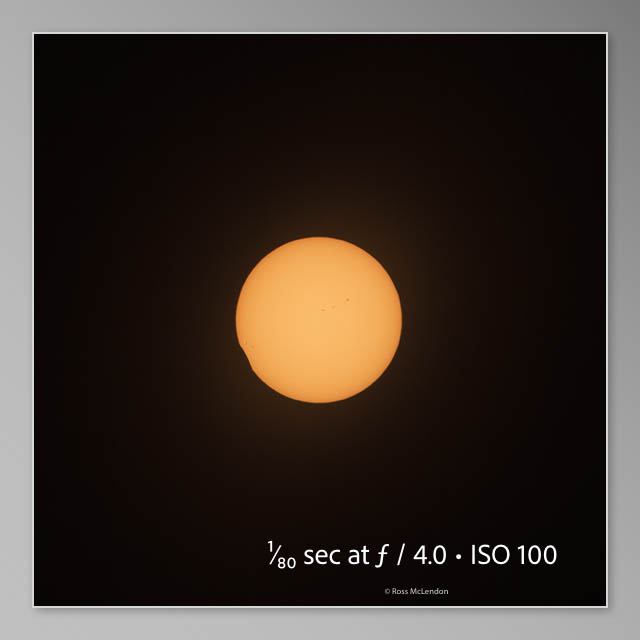
For partial phases, you want as long a focal length as you can get as the only interesting part through a solar filter is the disk of the photosphere (the bright layer of the sun that creates almost all of its light). The sun is very small in the sky - about 0.5º or 30 arc-minutes across. Exposure will depend on your filter - this is something you can pracitce before the eclipse. Note that the edge of the solar disk is darker than the middle (so-called limb darkening), so you may consider adjusting exposure as partiality progresses towards a crescent when the brighter center of the sun is covered. Sharpness of your images will depend on your lens, how well you focus, and atmospheric distortion (called seeing in the astronomy world). The photosphere includes a number of different features that you may be able to see with a normal solar filter. With any solar filter and a reasonable telephoto focal length, you should be able to see sunspots which are likely to be present on April 8 since we’re in a solar maximum. Depending on your focal length (if it’s very long), seeing conditions, and the quality/sharpness of your imaging equipment and your processing technique, you might be able to discern granules in the photosphere - cells of convection about 500-1000 miles across. Different solar filters will impart different colors to the sun - some white, some yellow/orange, even green if you’re using something like welding glass (which I don’t recommended). There are glass filters and film filters of various materials out there which do the job of reducing the intensity of solar light to a safe level. Here’s an example with a Thousand Oaks “Full Aperture” filter on an old manual 500mm f4.5 lens w/ a 1.4x teleconverter. The shutter speed was 1/40s, ISO was 400, and I can’t exactly recall the f-stop but I think it was maybe f/8 (manual lenses don’t record their f-stop with the EXIF data).
Of the various filter options out there, a few thoughts to consider…
- Thin film filters will be more forgiving optically when put in front of telephoto optics.
- Glass filters are more robust and easier to clean without damaging them.
- You’ll need to quickly remove your filter at the start of totality and quickly replace it at the end, which can be challenging with threaded filters.
- It’s possible to purchase solar filter material in bulk and fashion your own filter.
In 2017, I purchased a simple cardboard full-aperture filter. It performed well and was quite affordable. It was very easy to put on and take off my 70-200mm lens.
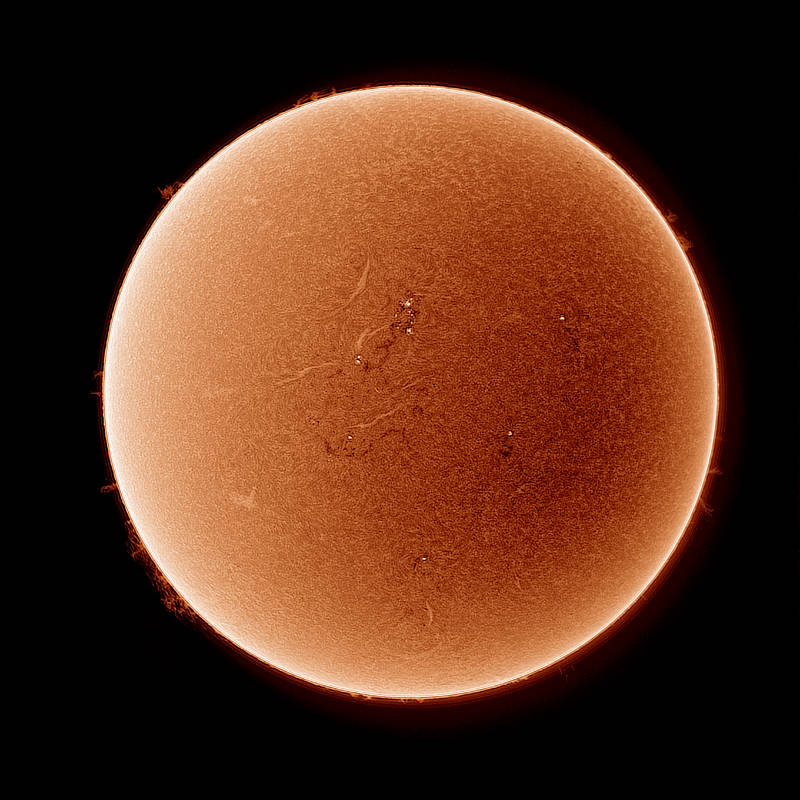
H-Alpha Filtering
If you want to spice things up for the partial phases, you could consider investing in H-alpha equipment. These are special filters designed to transmit very specific wavelengths of light. While a regular solar filter blocks almost all of the light coming into the camera/telescope, H-α blocks all light except for a very narrow band with a wavelength of 656.28 nm - think of just letting in a tiny slice of the rainbow. This light comes from the sun’s chromosphere and contains a great deal of detail that is normally washed out by the other spectra of light emitted by the sun.
This isn’t just another filter you put on your lens - generally you do H-alpha imaging with dedicated telescopes and monochrome cameras. Good H-alpha solar imagery is a major field in and of itself. I’m just getting into it, and have quite a ways to go.
Totality
Totality runs from C2 to C3, assuming you’re in the path.
Totality is when you take your lens filter off. Don’t forget to take your lens filters off. I’ve heard this from multiple folks who photographed totality (or tried to) in 2017 and learned this lesson the hard way. Give yourself some cue to remind yourself.
Features of interest
There are several different things to watch for during totality.
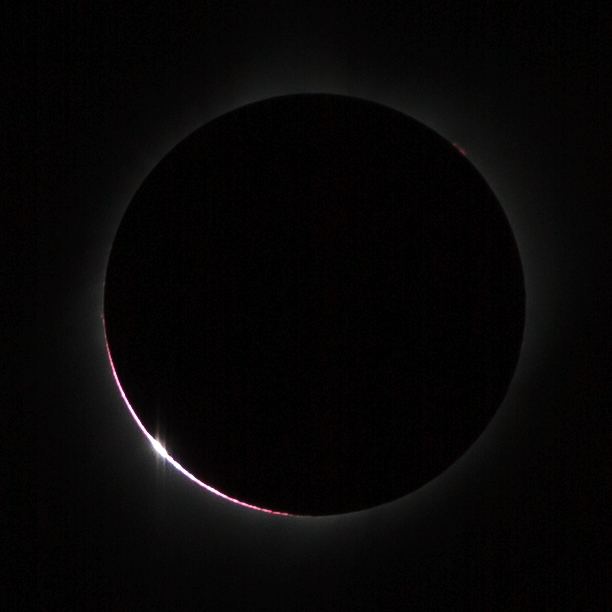
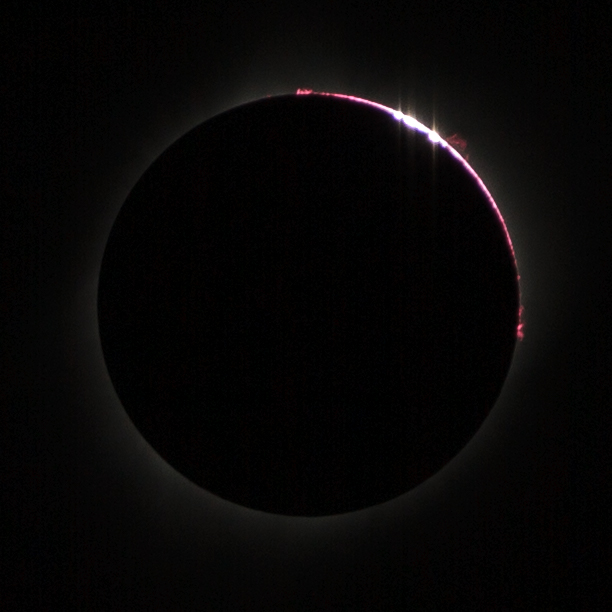
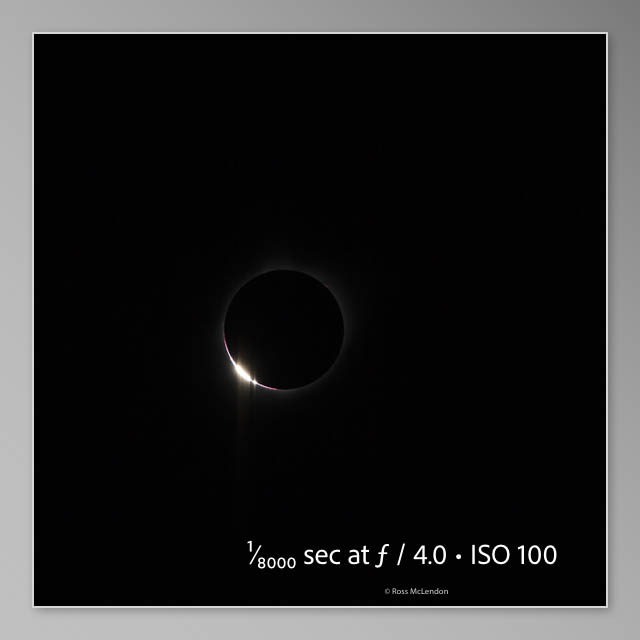
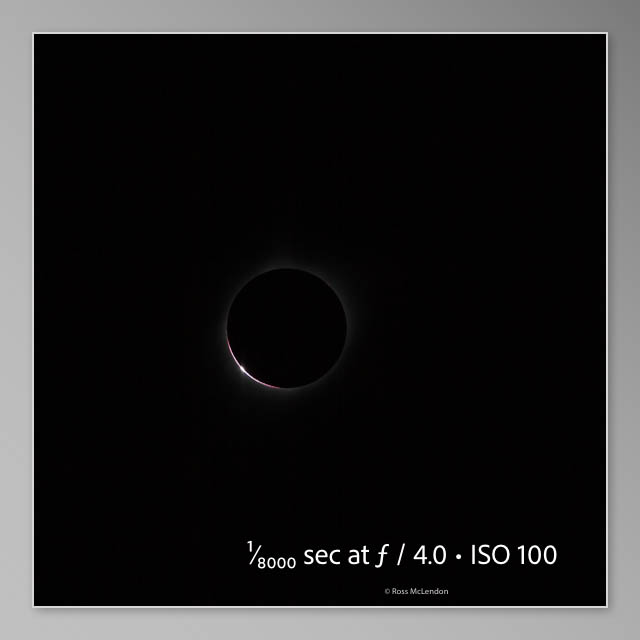
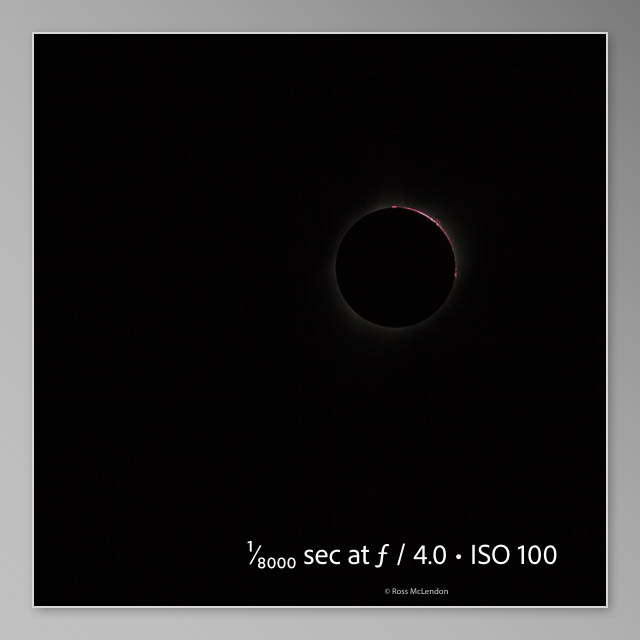
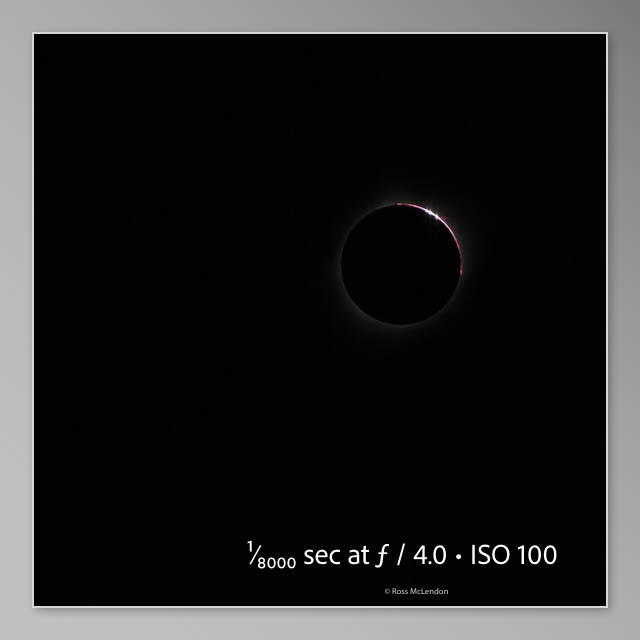
Baily’s Beads and Diamond Ring
This is the last bit of bright photosphere peeking between mountains and valleys on the lunar limb (the edge of the moon) at C2. Because the limb isn’t a pure circle but a jagged profile of the lunar topology, it creates these broken patterns as the last sliver of the photosphere passes behind the moon. This effect also happens on the other side of the lunar disk as the frist sliver of photosphere comes back into view. You should take your camera filter off to capture this, but leave your solar glasses on as the bright photosphere is still visible at this point. Also, very important - DO NOT LOOK THROUGH AN OPTICAL VIEWFINDER WHEN PHOTOGRAPHING THIS PHASE WITH AN UNFILTERED CAMERA - use live view instead. Any time any part of the photosphere is visible - even the little sliver associated with Baily’s Beads - your eyes need protection to look at it directly.
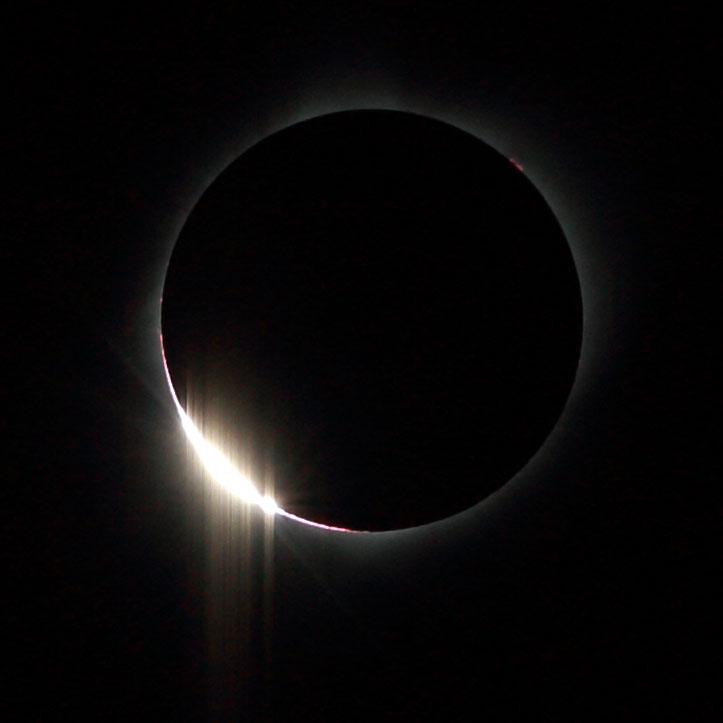
Appearance of Baily’s Beads
Note that the appearance of Baily’s Beads can vary significantly depending on where you are on the path of totality, because the limb of the photosphere will line up with different parts of the lunar limb at different locations. Baily’s Beaads also vary from one eclipse to another because of differences in apparent size between the moon and sun.
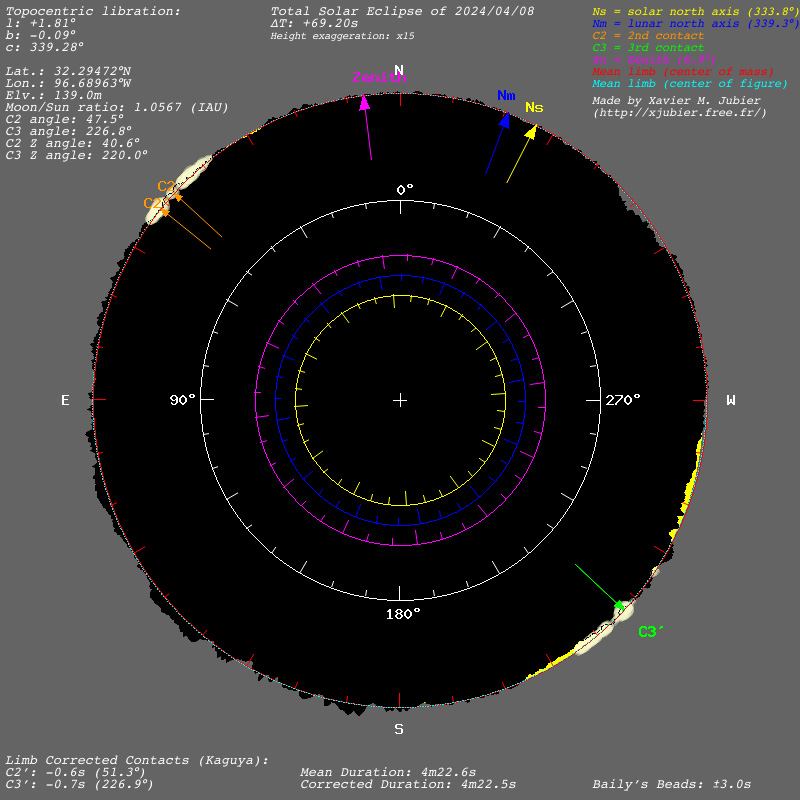
You can see see what the Baily’s Beads will look like at C2 and C3 for a given location using Xavier Jubier’s map web application. First, scroll to the location you want to examine. place the crosshairs at that location and click. You’ll get a pop-up showing various information relating to eclipse calculations at that point, including total time of totality and a table with timings of the various phases (in UTC - you have to convert this to your local time) along with information about altitude (angle above the horizon) and azimuth (angle from north) of the sun at that stage. One of the columns in that table is labeled LC for Limb Contact.
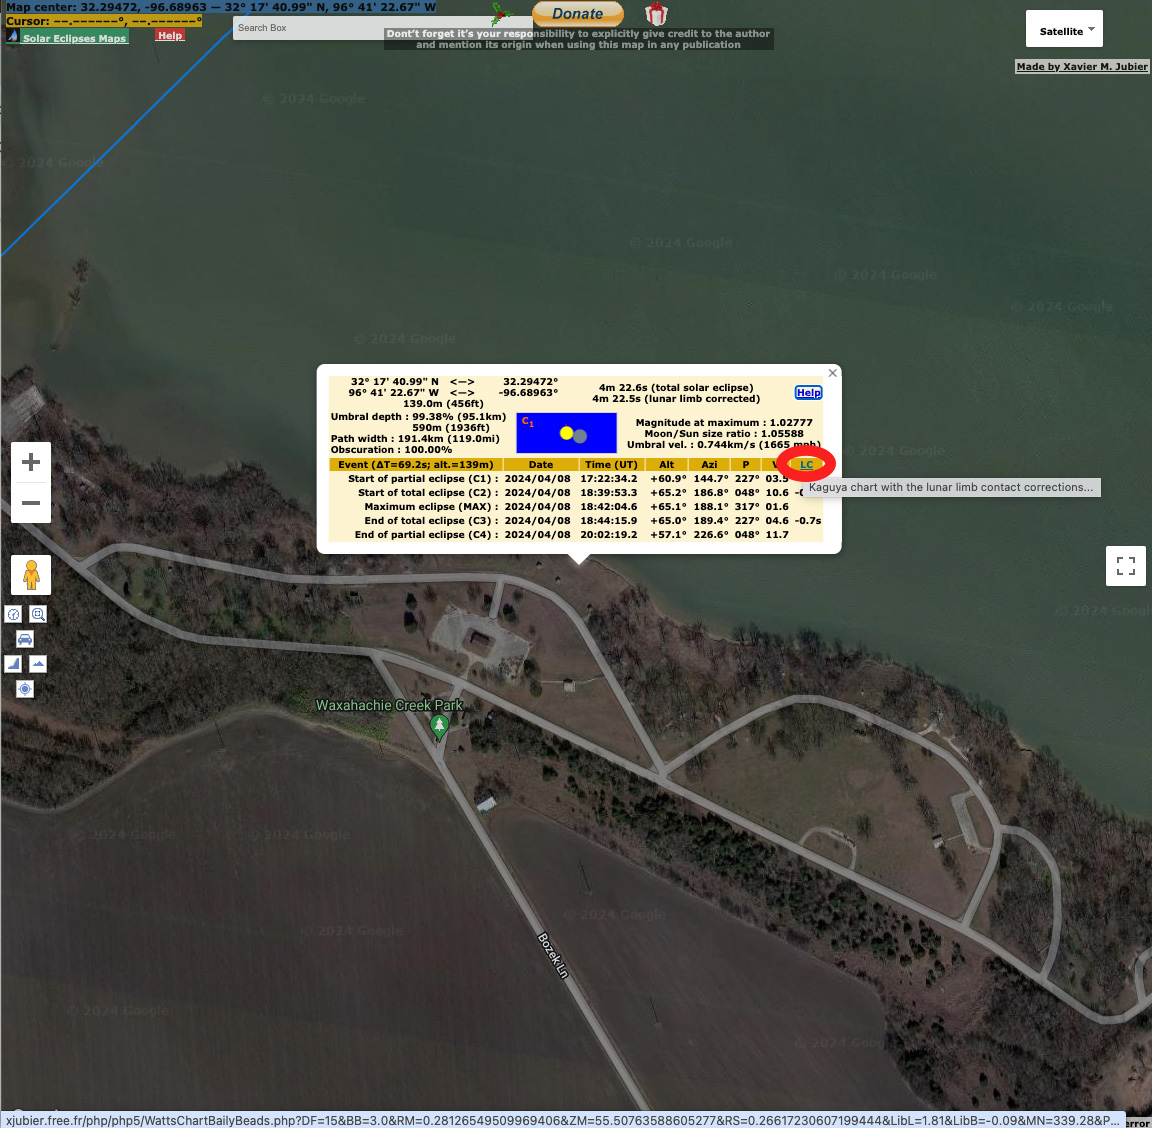
Click this column header (it’s a link) and Xavier Jubier’s website will produce a profile image based on Watts Chart data like the one below showing where the Baily’s beads will be at C2 and C3.
If you’re here looking for this data for an eclipse other than April 2024, Xavier’s website has a list of maps for eclipses going out over a decade here:
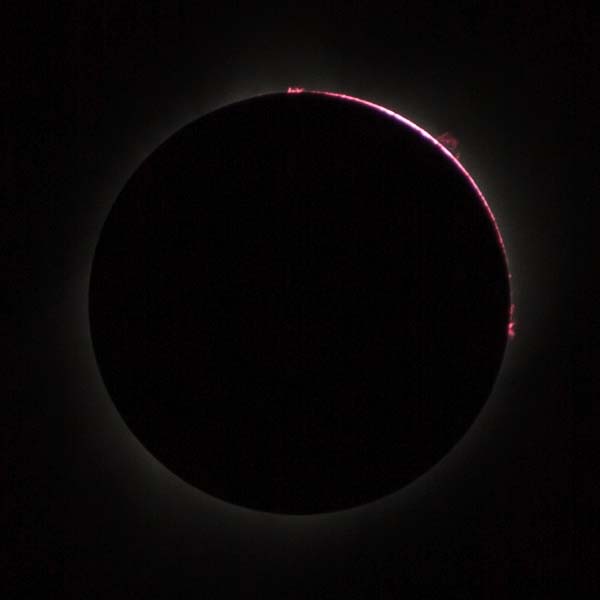
Chromosphere and Prominences
Once you take the solar filter off your camera, for a brief moment you’ll see the dim (compared to the photosphere) red chromosphere (the sun’s middle atmosphere) that extends about 1000 miles above the bright photosphere. You’ll also see prominences protruding away from the sun beyond the lunar limb. Long focal lengths are best for these. Because they typically only extend a short distance from the sun, they are most visible just after totality starts and just before totality ends. As a side-note - these are features that hydrogen-α filtering reveals, as the chromosphere emits its comparatively dim light at a very specific wavelength of 656.281 nm due to the elevated temperature (6000ºC-20,000ºC) of the hydrogen in that layer of the atmosphere. A hydrogen-α filter system is especially designed permit this light to pass through while blocking all other wavelengths.
Earthshine
While it’s not really visible to the unaided eye, long exposures will pick up detail of the moon’s surface which is illuminated by light reflected off the earth.
Stars
You’ll be able to see stars during totality. In 2017, Regulus with its bright apparent magnitude of 1.4 was quite close to the sun. In 2024, Epsilon Piscium will be the brightest star in close proximity to the sun with an apparent magnitude of 4.3. This is much dimmer than Regulus is, so don’t expect any dramatically bright stars in the frame immediately around the sun this year, but stars should be visible in more brightly exposed images.
Planets and Possibly a Comet
Jupiter, Venus, Saturn, and Mars will be in the sky around the Sun, along with comet 12P/Pons-Brooks which might be visible to the unaided eye and could add to a pretty stupendous view. You’ll need a wide-angle field of view to include these with the sun - check out an online planetarium like TheSkyLive.
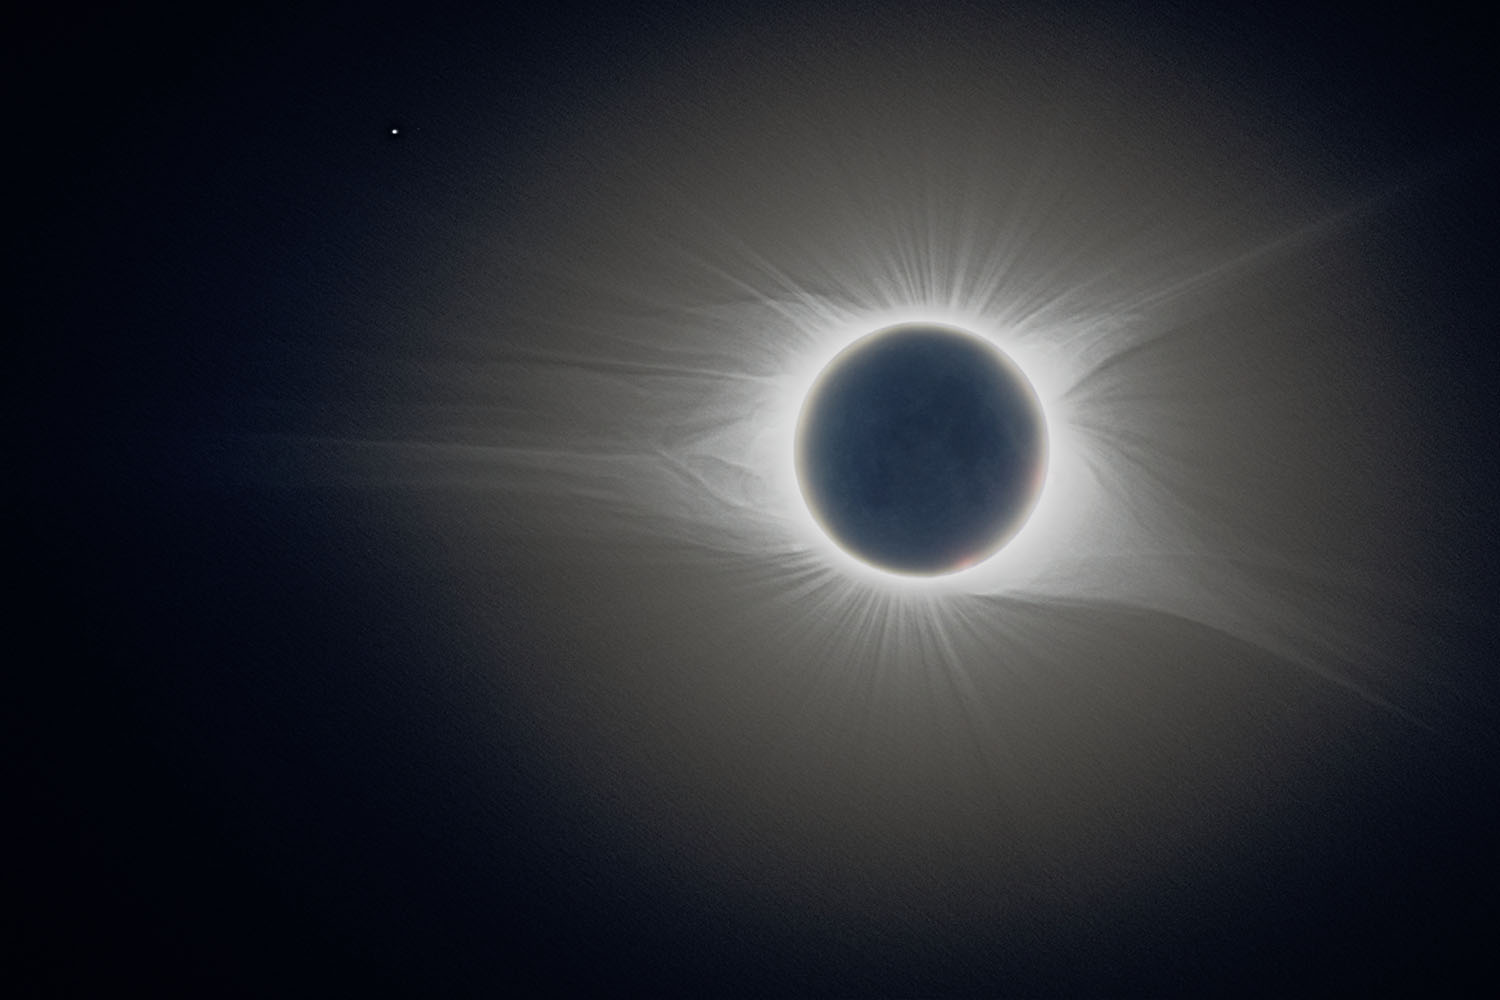
The Corona
The sun’s upper atmosphere. This is the visual apex of a solar eclipse. The sun’s corona is always there, but normally invisible to us because it is many times dimmer than the bright photosphere which, along with Rayleigh scattering in the atmosphere completely washes it out. It’s incredibly beautiful. It looks different in every eclipse depending on the highly variable magnetic field lines of the sun. It has extreme variation in brightness as it extends away from the sun which necessitates HDR photography techniques to really capture well. It extends away from the sun many times the diameter of the photosphere, so to capture it, you’ll want a much wider field of view than you’d want for photographing partial phases (or potentially several different fields of view). I personally have some plans for 2024 based on some imagery I’ve seen using focal lengths as wide as 85mm. If you have to choose a single focal length, 300-500mm on full-frame is probably a good option.
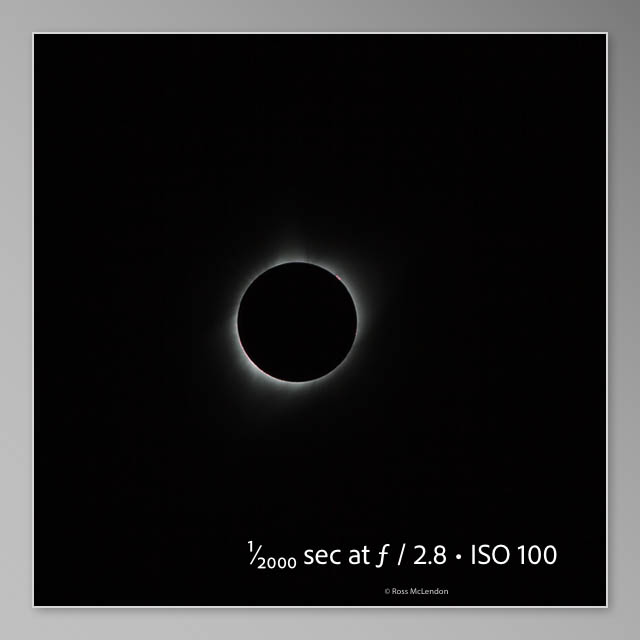
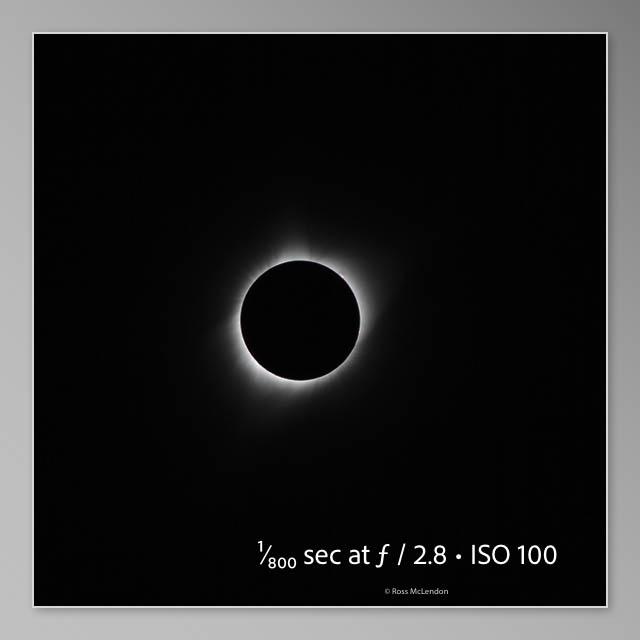
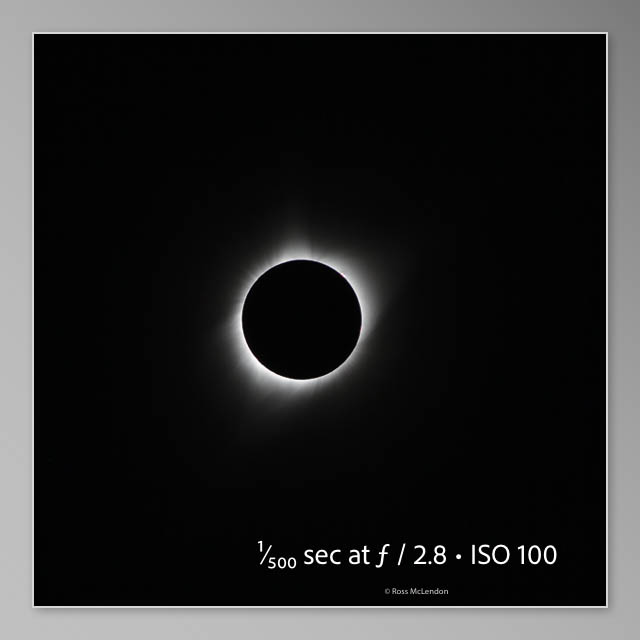
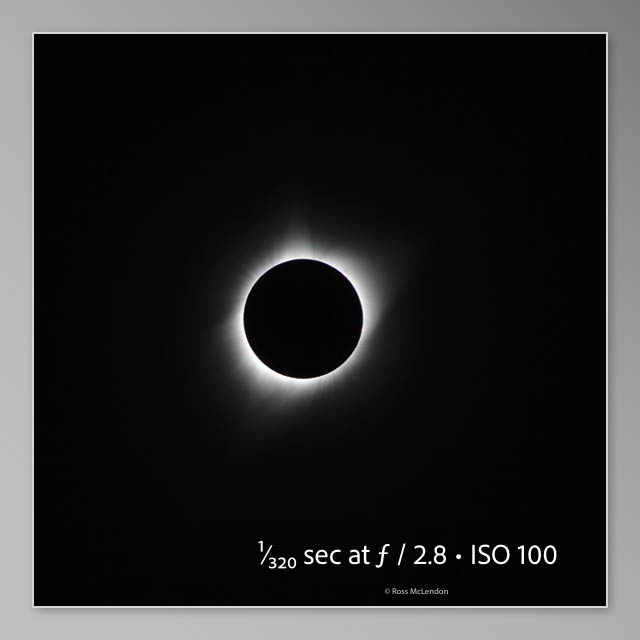
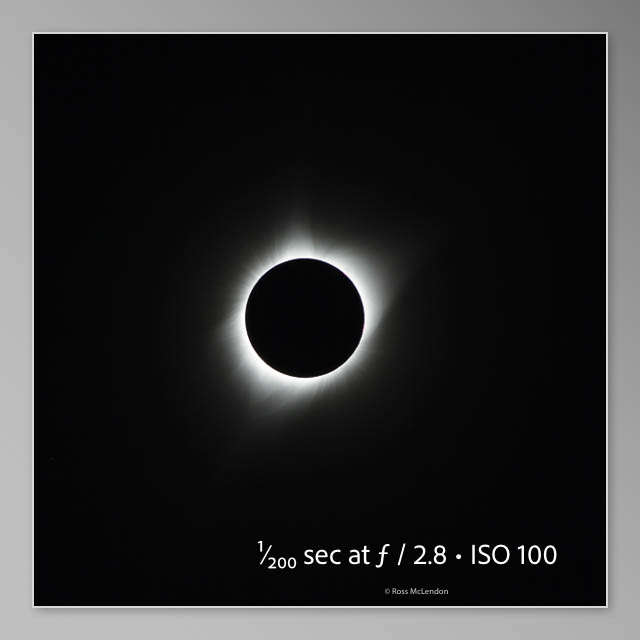
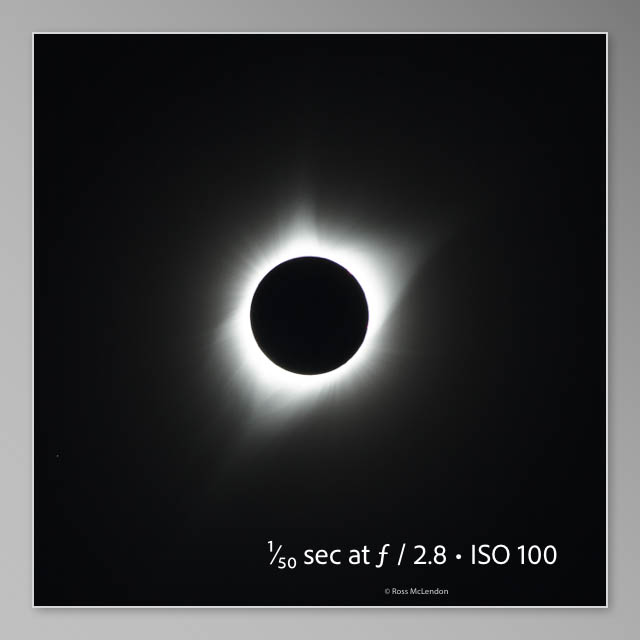
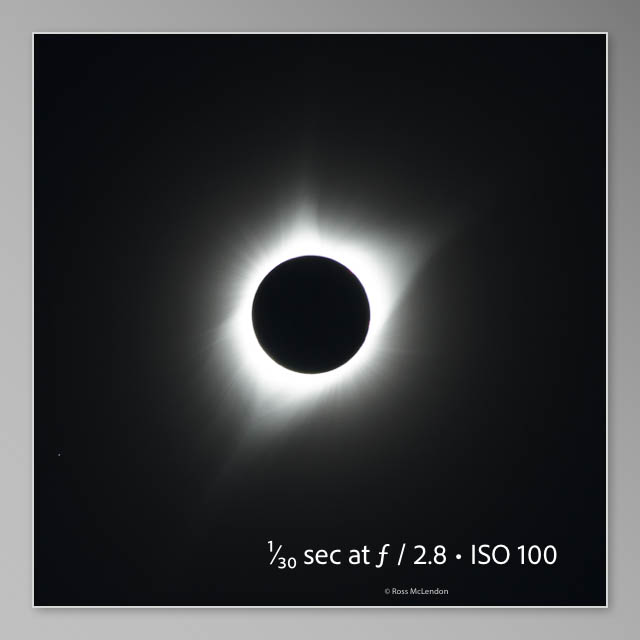
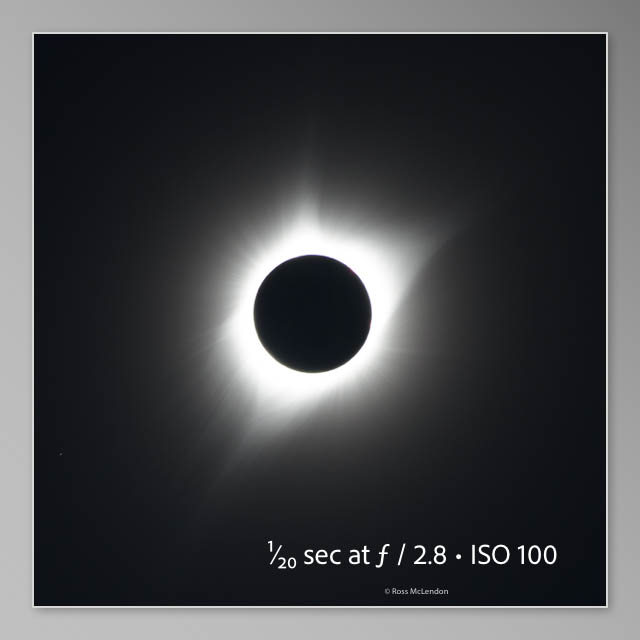
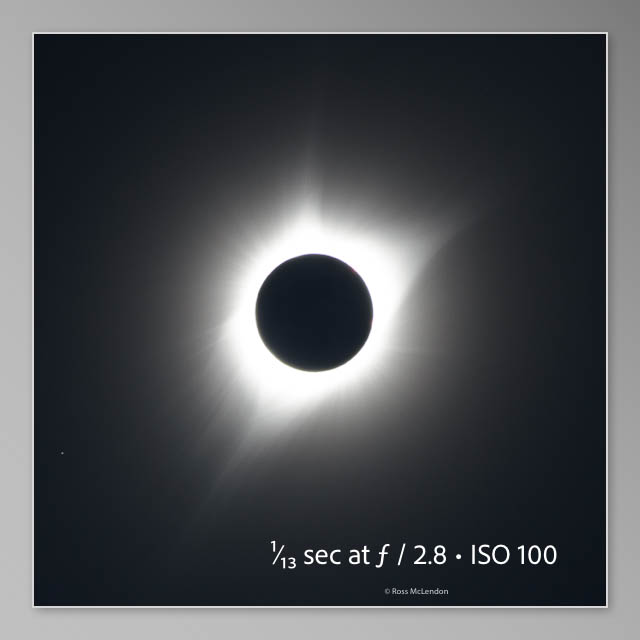
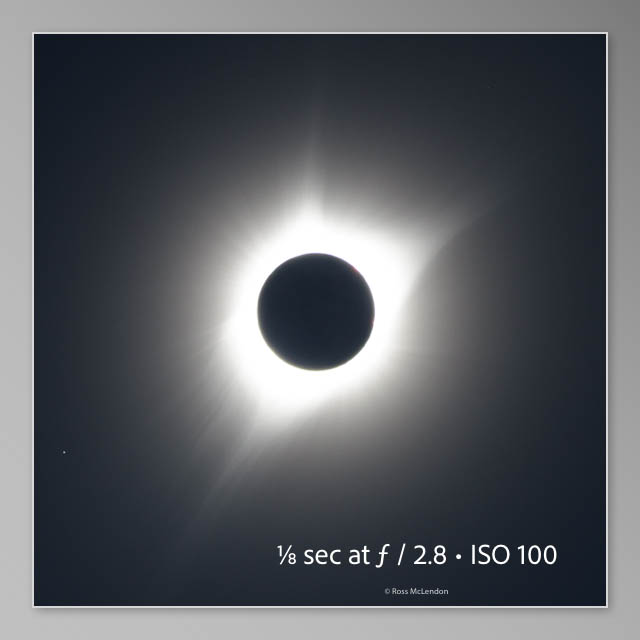
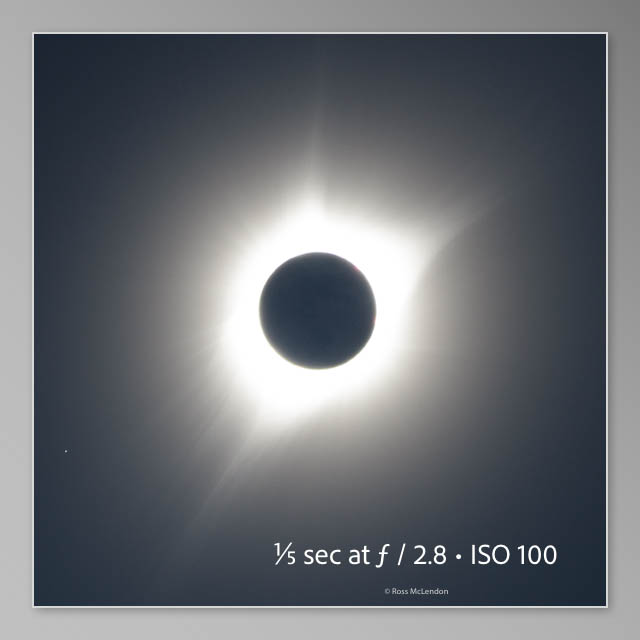
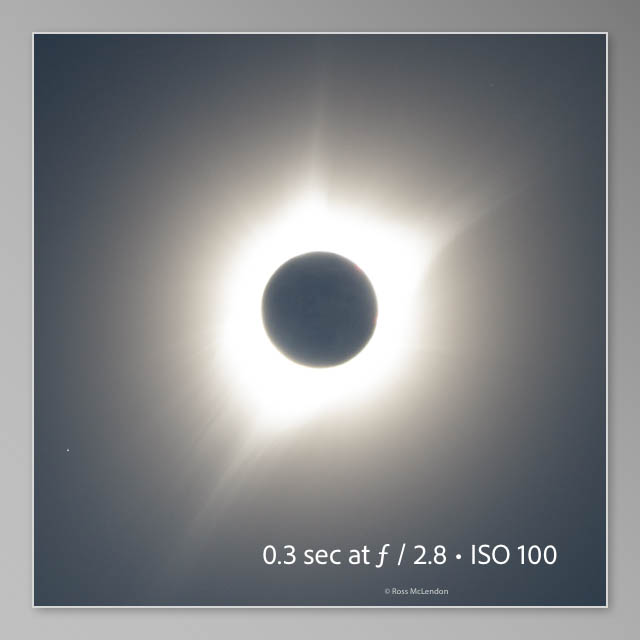
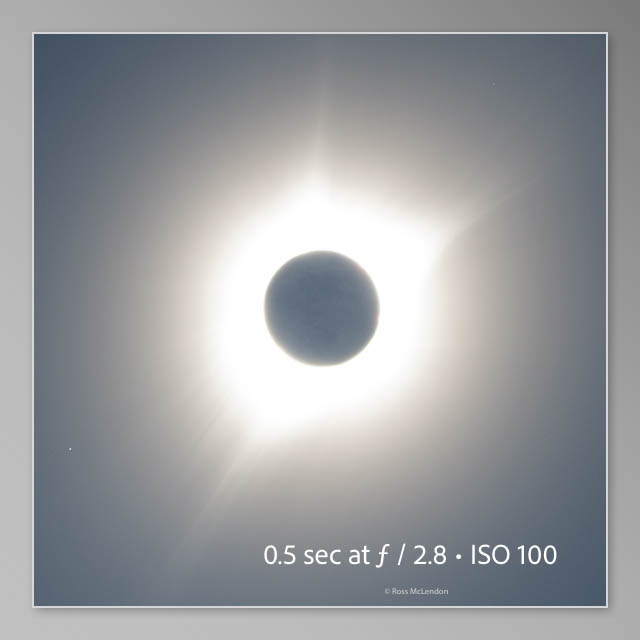
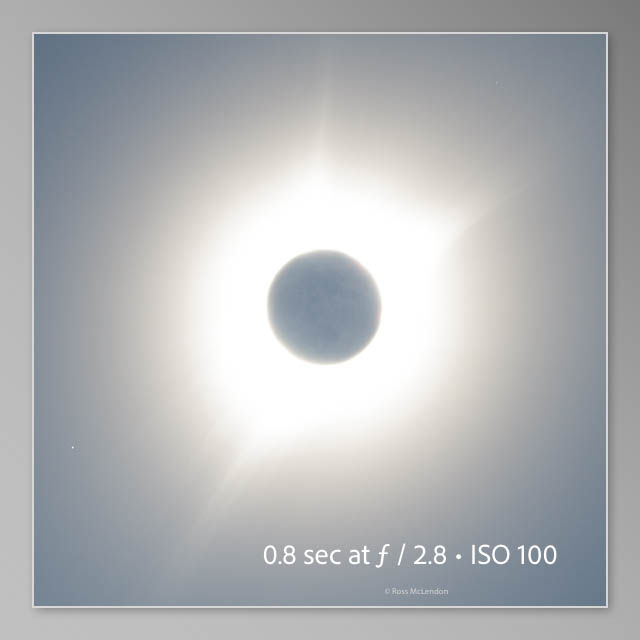
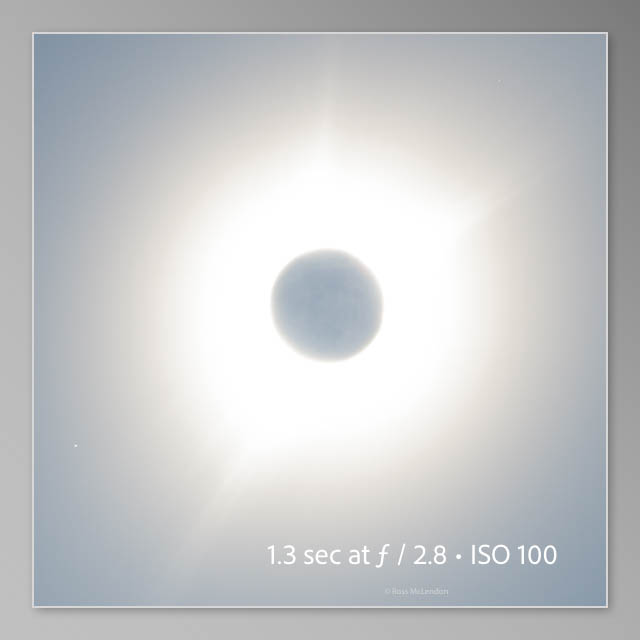
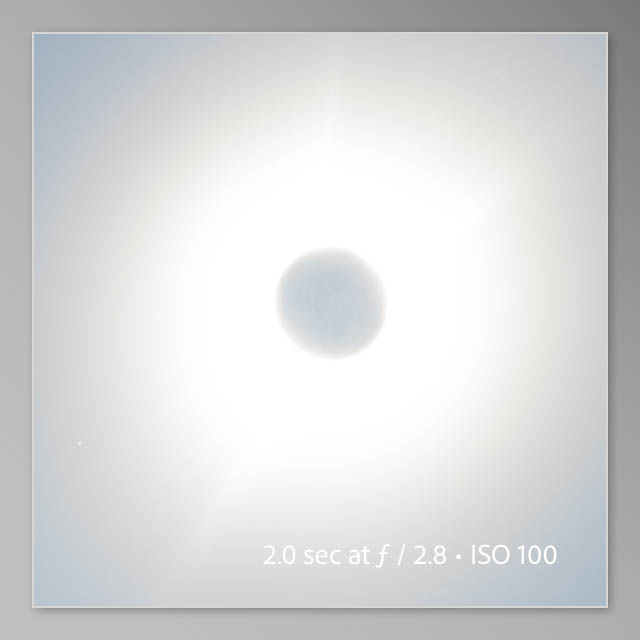
Exposures During Totality
This is the bit of the blog that’s probablby most helpful for new solar eclipse photographers since you can’t practice shooting a total eclipse until it happens. The corona is extremely dynamic, very bright toward the center and dimly extending out many times the diameter of the sun’s photosphere (the bright part). I took a bunch of exposures during totality in 2017. I put them together into a video along with the exposure info. Each photo here is rendered from Lightroom without any adjustments using a very neutral profile to give the best possible representation of how a given exposure renders the various eclipse detail. These exposures were captured from Glendo, WY under clear skies with little to no haze. The sun’s angle above the horizon was at 55º. Note that atmospheric conditions can change the apparent brightness of these scenes, but if you’re under clear skies in the US in April, these exposures should be pretty close to what you’ll experience - maybe a little dimmer in the northeast as totality will be later in the day with the sun lower on the horizon (36º above hte horizon in Maine).
Here’s a gallery of images from the same 2017 eclipse with exposure information included. Focus on the unfiltered Baily’s beads and totality images. During partial phases, you may need to adjust your exposure from what mine was depending on your filter, but unlike totality this is something you can test yourself ahead of time.


Another potentially helpful resource is Xavier Jubier’s eclipse shutter speed calculator web page.
Automation
The key to following my advice in the introduction and getting good images of totality is automation. If you can automate the capture of different exposures at different times, then you can enjoy totality while your cameras click away without you having to mess with them during those precious moments. A few options to consider:
- Intervalometer + Bracketing - You can set up your camera to shoot bracketed exposures and then drive those with an intervalometer (interval timer) that you start right as totality begins. This might be the easiest thing, but will make it a little tricky to capture things like Baily’s Beads that need quite different exposures than the corona.
- Custom Settings - Many cameras have the option to save custom settings on a particular position of your mode dial. You could consider creating these for parts of totality, such as one that runs during Baily’s Beads and the Diamond Ring and another shooting a broad range of bracketed exposures for capturing the corona. While this isn’t completely automatic, it does reduce the number of things you have to remember to do during totaltiy.
- Solar Eclipse Maestro - I used this in 2017, but, apparently some of the libraries that this tool used are no longer supported and so it hasn’t been developed for some time. As a result, support tops out at macOS 10.14.x (Mojave), so unless you have an old Mac lying around you’re willing to trust for the eclipse, it’s not an option today.
- SETnC - A free tool for Windows that will allow you to automate a single Canon camera, synced to different eclipse phases that the program will calculate from your latitude and longitude. You determine the exposure settings you want.
- Eclipse Orchestrator - a commercial program for various and multiple cameras. Must order at least a week before the eclipse. Support for modern Canon cameras may be shaky.
- CaptureEclipse - This is freely available on Apple’s App Store and supports modern MacOS versions. Rob Hawley created it for his own needs after Solar Eclipse Maestro went out of support and was kind enough to share it. It only supports (most) Canon cameras, and doesn’t allow as fine-grained control as Solar Eclipse Maestro did - there are pre-programmed exposure sequences it runs through for each phase whereas SEM let you specify exactly what exposure you wanted to take when. It also only supports one camera as best I can tell whereas SEM supported four. Still, if you’re on mac, use Canon, and want a turnkey option, this may be your best choice.
- EclipseDroid - An Android app for controlling cameras.
- Home-rolled program - I’m familiar with programming, so I downloaded the Canon EDSDK and am currently writing a program to drive multiple cameras. It won’t have a fancy GUI or options to automatically calculate eclipse phases from GPS coordinates in the program, but I’m hoping to make it reasonably general. Not sure I’ll distribute it, though. I think most of the other major camera makers provide SDKs for controlling their cameras as well.
Practice
Practice as much as you can. Run through any automation you’re going to do a few times to make sure you’re getting all the exposures you expect to get. Figure out what happens if a battery dies or a USB cable gets unplugged right before totality. Does your camera refocus? Do you have to restart some program? When do you take off your filters? How long does that take? Have a plan and checklist. You only get one shot at totality - if you’re experimenting and improvising you’ll likely not get photos and you’ll likely be distracted from enjoying the experience. The next total eclipse to cross the United States like this won’t be until 2045.
Post-processing
This is a huge topic in and of itself. I’ll just refer to a few resources on the topic here.
- The “Pellett” Method - My 2017 image borrowed from this technique. The linked page includes a good discussion of various methods.
- The work of M. Druckmüller - a professor in Slovakia, he and his daughter have contributed considerably to the topic of corona imagery post-processing
- Nicolas Lefaudeux - I greatly admire his work, which he indicates borrows heavily from Druckmüller.
Other photography pointers
- Turn off image stabilization if you’re using a tripod.
- At the very least, use a remote shutter release rather than pressing the shutter button on your camera.
- It’s probably best to use manual focus. Punch in to 10x in live view to set it. Note that glass filters might result in slightly different focus and necessitate a re-focus after you take them off at totality (in which case maybe do use autofocus, or use a film filter instead).
- Shoot in uncompressed (lossless) raw and use as close to your camera’s native ISO as your aperture will allow to get a good shutter speed. You’ll want every bit of dynamic range your camera will give you for the corona, and uncompressed raw formats generally yield somewhat better shadow detail recover than lossy compressed raw formats (and much better than shooting in .jpeg).
- Make sure you’re shooting with a fast enough shutter speed to freeze the moon and sun, especially if you’re shooting very long focal lengths on a static tripod. This is less of a concern if you’re on a tracking mount of some sort.
- Make sure to clean your sensors (or have them cleaned) beforehand. Dust spots can greatly complicate corona HDR post-processing.
Other Matters
A few things to consider beyond photography.
Traffic
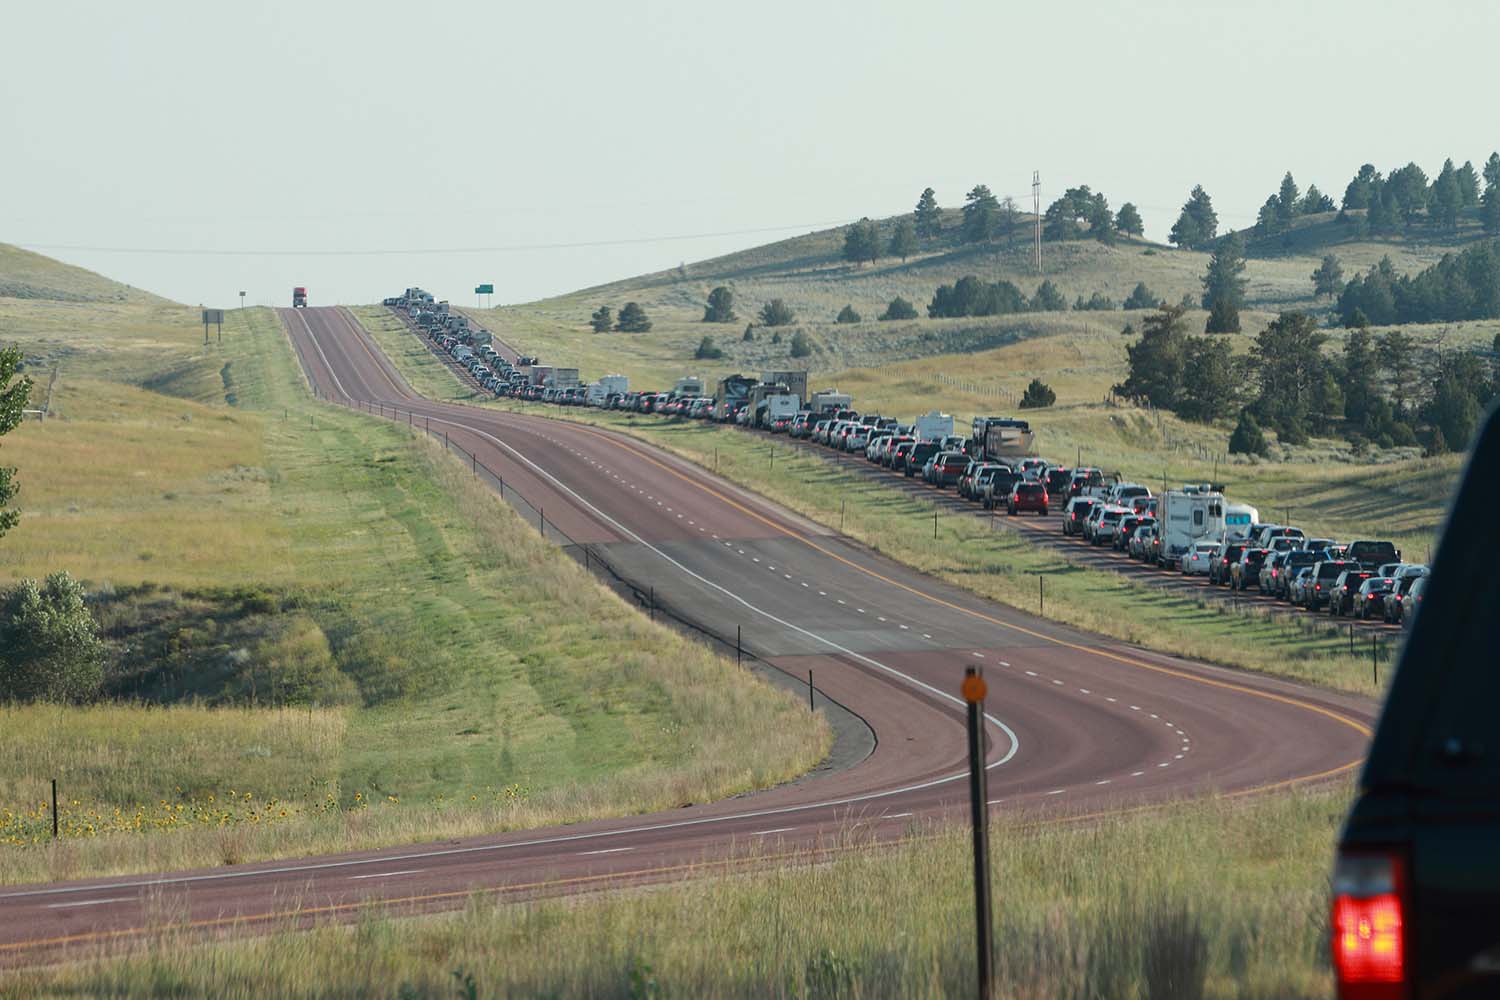
The post on my personal blog talks about this more, but be ready for extreme traffic jams immediately following the eclipse, especially if you traveled from a population center to get to the path of totality. Bring along a full tank of gas, some snacks, and plenty of patience, or plan to spend the night before heading out the next day. Also give yourself lots of extra time before the eclipse to get to your viewing location. You can’t control traffic, nor can you control the movement of planets, moons, and stars. If you’re late, you miss it.
Deeper Questions
Whether you photograph this event or not, I hope you enjoy it. And in the midst of all the beauty and technical photography, don’t forget to think about deeper questions like why the moon blocking the sun is so beautiful.